Monday, 14 March 2016

Lock a Folder With Password Using Free Folder Protector

Leave a Comment
All of us have some files and folders that we consider private. They can be anything from our business documents to pictures of friends and family. These are files that we don't want other people using our computer to know about. As Windows offers no way to protect our private information, most of us get in awkward situations when these files are discovered by unwanted people.

Surely, you can store this information in a hidden folder. The only problem is that anyone can easily search the contents of a hidden folder using Windows Search itself.

The only viable solution is storing this content in a password protected folder so that only those people knowing the password of the folder can access it. There are many folder locking programs available online but the problem is that most of the good ones are paid. Even if you do manage to get a good free one, you will be looked at suspiciously when people see a folder locker in the list of your installed programs.


If you too find yourself in a similar situation, you can try Folder Protector, a password protector for Windows folders that is not only free but is also portable meaning that it does not need to be installed. Just click on the exe file and the program will start running. I have created this program based on suggestions and feature requests that I have received by email over the last two years.


Folder Protector:

Folder Protector offers each user a protected folder that can only be opened by entering the password in FolderProtector. Unlike most security programs, Folder Protector is small in size (nearly 58KB) and does not show the folder that it is protecting. This gives an additional advantage that people who don't know the password do not have a target to try and hack their way into. As the software is portable, you can hide it or even delete it after protecting your folder and no one will have a clue what it was used. Then whenever you need to access protected files, you can re-download the program from this page, enter the password and access your protected files.

Download Folder Protector


Download for Windows XP

Important: 1) This program uses a simple method to lock files and should not be used to protect truly sensitive information. It is best to encrypt that kind of information.

2) Do not refresh your Windows when your folder is locked. Doing that will delete your files.


How to use Folder Protector?


When you run Folder Protector for the first time, the program will ask you for a password that you want to use. Enter a password that you can remember as this will be the password to your protected folder.

Lock Folder With Password

After entering the password, the program will open a folder named SecuredFILES. This is your protected folder. You can add all your private files in this folder. This folder is located at the Desktop. After adding all your files, you may close this folder. 

Then, you can use the menu in the program to lock your folder. To lock the folder, type lock as your action. After successfully locking the folder, FolderProtector will display that the folder is locked.

Free Folder Lock

Unlocking the protected folder is easy. Just type unlock as your action. Then the program will ask you to enter your password. Upon successfully entering the password, the program will display the contents of your protected folder.

Changing the Password: Just type change as your action. The program will ask you for your current password. Upon successful entry of the current password, the program will ask for your new password and change it instantly.

Acknowledgment: This software has been made possible only through the suggestions of readers of this blog, especially Ernell Albert Galido for his idea of using a menu-based interface.

Windows Compatibility: This program has been successfully tested on Windows 8.1, Windows 8, Windows 7, Windows Vista and Windows XP.

Support and Development

I will continue to develop this software further. So, your suggestions are invited. If you face any problem while using this software, you can use our support page.
Read More

Tuesday, 8 March 2016

How to crack laptop/pc password easily

Leave a Comment

Method 1:


if your friend or someone put the password to their computer or laptop and they did not want anybody to have access to it, then you will be able to unlock the password and gain access to its system menu

first, take the laptop you want to open its password,

then restart it and press F5,

then select "Safe Mode"

And Select"Administrator" then go to "User A/C" and click

Remove PassWord.

you are done. the system will open immediately.


Read More

Sunday, 6 March 2016

Top 20 Android Apps Used By Hackers For Hacking

Leave a Comment


Hacking apps


Here are the top best 20 android hacking apps 2016 that hackers used for pen testing, hacking, wifi hacking, Facebook, WhatsApp testing and security attacking from android, Download the apps given in the article.
Note:- This article is for knowledge and the apps shouldn’t be used for illegal activities, I am not responsible for anything happen to you.

1. AndroRAT :

AndroRAT


AndroRAT is used for android devices for remote administration. Basically, the Remote Administration tool is a client-server application that helps in controlling the system without having access to the physical part of the system.

2. SpoofApp:


SpoofApp helps in spoofing calls with any caller ID number. You will receive a free5 minute Spoofcard if you are installing it the first time. With the help of SpoofCards which are sold separately, we can SpoofCall. Many other features are included as Voice changers that can change your voice. It also has the feature that you can record the whole conversation. This app is very useful and works on all Android devices. It is also a safe and virus free app.


3. Whatsapp Sniffer:


Whatsapp Sniffer Basically is a great famous android hacking app. With the use of this app, You can hack Whatsapp chats, pictures, videos, audios of your friends who are using your wi-fi hotspot. While using this tool, disable your antivirus as the antivirus can detect this app.

4. APK Inspector:


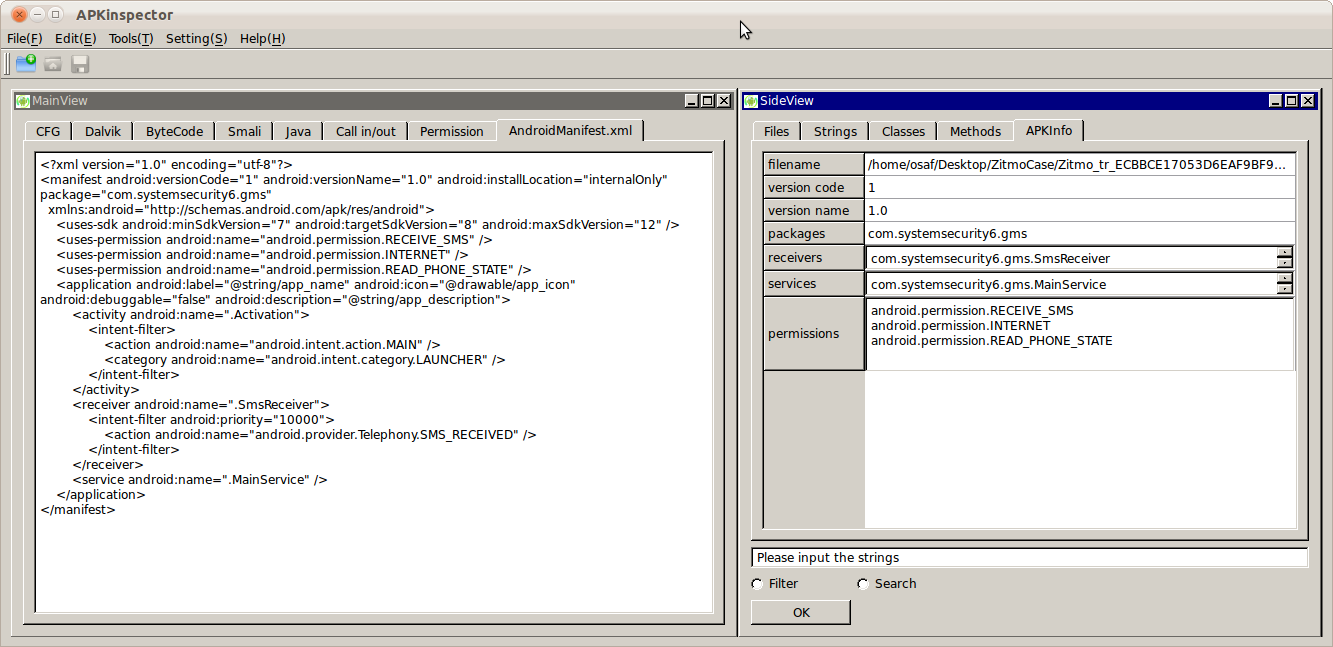
APK Inspector is used for Reverse Engineering. It is a successful GUI tool to analyze the android applications. With this, you can easily fetch the source code of any android application. This app helps to visualize compiled Android packages and corresponding DEX codes to remove licenses and credits.

5. Wi-Fi Kill:


With this app, You can disable the connection of a person who is using the Wi-Fi network. You can disable any device connected in the same Wi-Fi in which you are connected too. While using this app, make sure your phone is rooted and you can easily kick another user from Wi-Fi.

6. DroidSheep:


Droidsheep allows the same process as done in Facebook hacking you get lots of questions. It allows us to catch social accounts by hijacking sessions on the android devices present in your network. Hijacking sessions requires knowledge about how session hijacking works read on W-fi. This app is mainly used for security analysis. It can detect Arp-Spoofing on the network, Faceniff and other software.

7. Eviloperator


This app automatically connects two people in a phone call making them feel that they called each other. A good thing is you can record and save the conversation.

8.Zanti:


Zanti is the best hacking app for android devices. It covers almost all security tools related to hacking any Wi-Fi networks. This is one of the best and favorite tool for the hacking of android devices present in your network.

9.Shark for Root:


This app is mainly for a traffic sniffer for android devices. Through the use of this app, you can sniff any network and can collect lots of data and information from any Wi-Fi network. It runs on 3G and Wi-Fi and also in Froyo tethered mode.

10. android:


android is a tool designed for security Professionals for performing Denial of Service attack. Denial of Service attack is carried out on websites or web serves using android devices.

11.NESSUS:


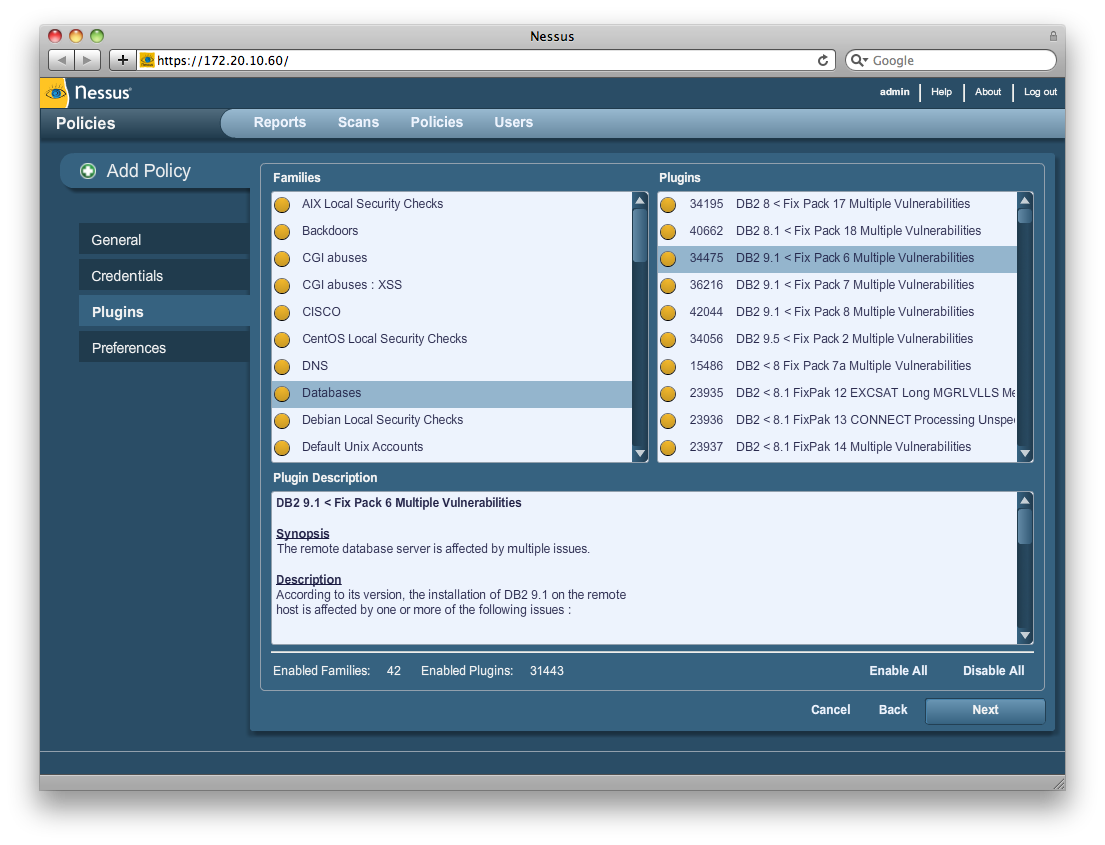
Nessus considered the world’s most famous vulnerability scanner, used by over 75,000 organizations worldwide. Nessus is an inclusive vulnerability software used basically for scanning. Its main goal is to note potential vulnerabilities on the tested systems such as few common passwords, default passwords on some system accounts or misconfiguration or denial of service attack against the TCP/IP stack by the use of crushed packets.

12. FaceSniff :


facesniif is a hacking app particularly used to sniff Facebook Id over the same Wi-Fi network. It also helps you to catch the email address and password connected to the same Wi-Fi network. It too has many features: Blogger, Twitter, Tumblr, and many more online accounts. This app comes with a paid version but also there are many cracked versions on the internet.

13. AppUse


AppUse stands for Android Pentesting Platform Unified Standalone Environment. This virtual machine was developed by Appsec Labs. It is a unique and free platform-independent for mobile application security testing done on android devices.

14. NMAP for Android Nmap ( Network Mapper)


Nmap runs on all major types of the operating system especially console and graphical versions. Nmap is basically a free and open-source benefit for network research and security inspection. Its usefulness is also carried out by many systems and administrators for their tasks such as network monitory, managing service, upgrade schedules and many more. Its main purpose in designing is to scan large networks rapidly but works fine against single hosts.

15.Network Spoofer :


Network Spoofer is an android hacking app that allows you to change the website on another person’s computer from your Android Mobile. This app declares you how vulnerable the home network is.

16. Droidsqli:


This app is particularly used for hacking websites. Using this app, you can hack the website through the sqli attack method. It can also hack the admin username and password easily.

17. insider:


inside is an app that carries out hidden WiFi in your area. It also carries out a hidden SSID WiFi signal and also finds out a low range wifi signal present in your area. If Some smart wifi is living in your area then they set hidden SSID through which you can’t see wifi name normally on your phone.

18. Penetrate Pro


Penetrate Pro app is particularly used to hack passwords of Some routers. It calculates WPA/ WEP security keys for the routers.

19. Hackode


It’s a toolbox for hackers. Hackode is an application made for ethical hackers, IT administrators, Security analysis and cybersecurity professionals. It includes many features as DNS Dig, Google Dorks, Whois, Ping, etc.

20. WPScan


We all know that WordPress is one of the most famous CMS and is being run by millions of websites. So in that case, WPscan is the vulnerable scanner of WordPress for android devices.
Read More

Remove Write Protected From Pendrive and Memory Card

Leave a Comment


Remove Write Protected From Pendrive and Memory Card

Sometimes we want to format a pen drive and memory card but we aren't able to do it. When we try to format the pen drive and memory card then we get a pop-up window saying the device is write-protected. Now, I have a solution to remove the write-protected and format the pen drive and memory card.

Howto?

1.  Firstly, click on the start.

2. Then click on run.

3. Then type Regedit and then press enter. Now the computer will ask to allow to run the program click on yes.

4. Now, this process will open a registry editor.


5. Now go to  


 HKEY_LOCAL_MACHINE\SYSTEM\CurrentControlSet\Control\StorageDevicePolicies


6.  Now right click on write-protect and then click on modify. 


7.  Now change the value data to  0. And then click on ok.


Note:- If you can't find the StorageDevicePolicies, after the control folder then you have to create this folder. For creating it, steps are given below,

          1. Select CONTROL folder in the left navigation pane.

Read More

REMOVE WRITE PROTECTION IN PENDRIVE AND MEMORY CARD

Leave a Comment


Don’t you just hate it when you buy a Pendrive or a Memory card and there’s nothing you can do to it? Whether it comes with software on it, or you’re just trying to use it for any other purpose, you should have the right to change things up however you like.
In this guide, you will be shown how to Remove Remove write protection in Pendrive and Memory Card. It’s a fairly simple process, so be sure to follow each and every step carefully. This guide is for information purposes and we are not responsible for anything that may happen to your device in the process.
Before we proceed, what is Write protection exactly? Write Protection is when the manufacturer locks the device down from being written on and prevents unauthorized access to add, change or delete the files on the device. While the uses of write protection are a good thing because it prevents files from being tampered with and the manufacturer can make sure all users are getting the same files, but it’s also very inconvenient. To remove this protection, you will need to format the drive.
In this guide, I will show you exactly how to do that. Follow each and every step carefully, please. Windows platform is used for the purpose of this guide.


HOW TO REMOVE REMOVE WRITE PROTECTION IN PENDRIVE?


Step 1: Plugin your pen drive into your USB 2.0 on your computer. To make sure the computer has read your pen drive, you can go down to your bottom left on Windows, you will notice a small USB drive icon. If you click that, it will say “Removable Disk.” This means that the pen drive has been read successfully.  You can take a backup of your files from the pen drive or Memory card Because we here are going to format it Completely.


Step 2: Next we need to open up the command prompt. You can do this by simply going to “Start”, then just search for “Command Prompt”, or you can simply just type in “cmd” and a command prompt should pop up.
Step 3: In the command prompt, type in the drive letter of your pen drive with a colon at the end, like this: “ F: ” but without the quotation marks.
Step 4: After putting in the previous command, type in “format” without the quotation marks. Here’s how to do it: “format F:” and then press “Enter.”
This should get the process started to Remove write protection in Pendrive. Make sure that you are entering the right command with the right drive letter. If you have more than one pen drive plugged in, make sure that you do select the right one as you can accidentally format the wrong drive, causing loss of data.
Step 5: After the process is complete, proceed to the close command prompt.
Read More

CREATE WINDOWS 8 BOOTABLE USB – HOW TO GUIDE

Leave a Comment


There are several ways of installing an operating system on your computer. Most people do it by using a bootable CD/DVD of windows. But we really don’t need to install windows very frequently and because of this, it is so difficult to put this bootable disc in a safe place and remember where you have kept it when needed. Here are steps to make Windows 8 Bootable USB.
Also, several times when you are installing a window you see some error saying that some of the necessary installation files are missing from the disc and setup can not be continued. All this happens because of scratches present on the disc surface since the disc is too old to use.

Apart from all these, Not all Computers have working CD or DVD Drives. This creates a big issue for those who want to install operating systems via the Disc method, So today here I bring an easy tutorial to Create Windows 8 Bootable USB.

HOW TO CREATE WINDOWS 8 BOOTABLE USB


I here Assume that you already have an ISO image of Windows 8 or 7 of which you want to Create Bootable Pendrive.
Step 1: Download Windows 7 USB/DVD download tool and install it.
This tool is available for free from Microsoft Corporation as well so you can get it from there too. Despite its name, this tool works with Windows 8 ISOs as well. You can use this tool for any version of Windows.
Step 2:After downloading and installing the tool, Run it, now you need to Browse and give the path where the ISO  file is located in your computer.
Step 3:Now select whether you want to create a bootable DVD for windows or you want it to be a bootable pen drive. Here you need to select a USB device because you want to make bootable Pendrive.
Step 4: Browse and select the pen drive which you want to make bootable. Make sure that the pen drive has at least 4 GB free. Now click on Begin Copying.
Step 5:Once you begin copying, the tool will start creating a bootable Windows 8 USB installer flash drive using the Windows 8 ISO. Let this process complete, lastly when you see the message “Bootable USB Device created successfully”, you can restart your PC and boot from the USB drive.
So this was my Quick tutorial on how to Create Windows 8 Bootable USB, Hope this will help you.

Read More

BOOST YOUR PC PERFORMANCE-HOW TO GUIDE

Leave a Comment

It is frustrating, when you sit down to work, doing something important, and your computer takes long processing time for every possible instruction you give. A great amount of dissatisfaction is felt when these electronic devices work slow. The mobile phones and the computers are the two devices where the user wants results with the click of a button and in a fraction of a second.
Over some time the speed of these devices especially computers go very slow. A variety of reasons that can be traced for Poor performance are:
  • Hard drive space not enough
  • Too many unused programs on the disk
  • Outdated versions of the operating system
  • The outdated version of the drivers installed


TIPS TO BOOST YOUR PC PERFORMANCE


1)There are lots of ways to Boost Your PC performance and improve performance even without changing the hardware. One of the biggest and the common reason for a slow PC is the presence of a virus, a malicious program that affects your PC speed. The virus eats your PC speed by using the computer resources and it also corrupts the system hardware and its software. Installing a good antivirus or even installing some basic antivirus would surely improve the speed and would accelerate the speed.
2)Having lots of load on your hard disk drive also slows the speed of your PC. The PC needs 5GB of free space to work and if you do not have then the speed is affected. The solution in such a scenario is simple which is either to remove the unwanted files or transfer them to any other external hard disk especially the audio, video and the image files that occupy a lot of space.
3)Having too many shortcuts or having too many unused icons on the desktop or unused files all are substantial reasons for a slow PC. It is essential to reduce this clutter by deleting it. There is always a set of junk files created when you work on the internet especially when you download files, install programs or even when you uninstall programs. It is extremely essential to remove these junk files once the task is done to ensure better performance.
4)Disk defragmentation utility in the Windows operating system is one of the best ways to improve your system performance. It is seen that over some time you perform certain activities like creating a file, modifying a file or deleting a file due to which your files get scattered on the disk. It becomes time-consuming for the system to retrieve such files so the disk defragmentation utility enables to fragment of the scattered file. It can be used once in a week for better performance
5)The disk cleanup utility can also be used to clean all the unused and unwanted temporary files created at the time of using the internet. Also, it cleans all the files in the trash that are no longer required. So implementing some of the few tips mentioned above can surely give you a better PC performance.
Read More

CONVERT ANY WORD DOCUMENT OR WEBPAGE TO PDF

Leave a Comment


Many times when we are randomly opening pages of some websites or going through different sites, we see some topics which seem really interesting. Often when we are looking for some particular topic, we reach some other post which is interesting too but we have to continue to our search and leave that page half-heartedly. Many of you might be aware of the default option provided by browsers for saving web pages to your computer and read them later while you are offline. You can do it by using the option “ Save Webpage As…”


But these web pages saved by this method are not that good quality files. When reading, it seems that we are still looking at the website and not on our computer. So today I am going to tell you a trick to Convert Webpage to PDF and saving it to your computer simultaneously.


HOW TO CONVERT ANY WEBPAGE TO PDF


There are two very simple and automated methods to Convert Webpage to PDF format.

METHOD 1: PDFMYURL.COM

Pdfmyurl.com is a website that provides service of converting any webpage to pdf format and make it available to save on your system free of cost with the blink of your eye. It is very fast.
All you have to do is simply open the PdfmyURL website and paste the desired URL or website address which you want to convert to pdf and click on the button placed at the right side of the text box. It will convert that URL into pdf format and ask for saving to your system.

METHOD 2: USING NOVA PDF

You can convert webpage to pdf from popular browsers like Internet Explorer, Firefox, Opera and Chrome by installing a Nova PDF creator that works as a virtual PDF printer. Once the printer is installed, you can simply print to it and a PDF file will be generated.
Just download this software from their official site here: DOWNLOAD
Install it to your computer and then it will automatically add a new option to your browser’s print button i.e. Nova print server. Select it and click on print. It will save that URL as pdf. You can also set margins of the page using page setup before downloading the pdf to set the size of pdf file you want.
So this was all about saving a web page as pdf document now I would also like to tell you about How to convert word document to pdf file.

It is a simple task to convert any word file to pdf file. It can be done online or by some software. The best way to do it is by using wordtopdf.com
his site will do your work in three simple steps. Browse your file, Enter your email address, click on convert and within a few minutes the converted pdf file will reach your inbox. There are many other sites as similar towordtopdf.com so if this site doesn’t work for you, simply google it.

Read More

WHAT IS TROJAN HORSE VIRUS AND HOW TO REMOVE IT.

Leave a Comment

Are you facing virus threats on your computer? Is your computer behaving abruptly or are you the victim of a disk crash?  Is your computer hacked by a Trojan horse virus attack? A Trojan horse virus attack is one of the most dangerous threats to your computer and needs to be fixed immediately. If it is not protected on time, then the virus can lead to failures in connecting to the IRC network or even worse can lead to your computer hacking and then your computer might be used by some anti-social elements in shaping some criminal attacks.


ABOUT TROJAN HORSE VIRUS


Before knowing how to remove this evil threat first one should know what actually a trojan horse is? It is a security breaking program, also malicious to your computer and is disguised in some benign object. It can be downloaded unknowingly through any document, executable, zip, movie or music file and unleashes a dangerous malware into your drive on executing the files.
This malware can completely wipe your disk or can even send your credit card details and passwords to any stranger on the web. It is not at all operating system specific. It can affect any operating system but affects windows more promptly due to its popularity and weaknesses. This is a silent attacker and many people come to know about its attack after it has infected other connections.

HOW TO REMOVE TROJAN HORSE VIRUS


  • There are many ways one can avoid itself from being a victim of this malicious virus but the best is to be attentive in downloading and executing files from an unknown source or person and also doing a background check of it if downloading from a known source. But if you have already been a victim of it then you need to take immediate steps to remove it from your drive before it creates some major problem. You need to repair and then reformat your system completely to remove all malware which may take from several hours to several days.
It is quite possible that the removal has not been done properly and may lead to the coming back of the virus again and again in such cases you must take stronger measures to curb this problem.
  • Firstly you need to have anti-virus software installed in your system and that too an updated one or else they will miss the latest species of Trojan horse. Anti-virus software helps prevent the system from many Trojan viruses. Then make sure you have updated your operating system as well with all new security patches.
  • One may also have to install Anti-trojan programs like The Cleaner which specializes in Trojans. Once it is installed reboot your computer in safe mode and use the cleaner to clean all registries and drives for any Trojan suspected. Make sure the internet is unplugged while cleaning. Once cleaning is complete reboot the system again.
  • After using the cleaner make sure that you have updated your operating system and have changed all the passwords. Once the system is repaired make sure to take a backup of every data and reformat the system completely.

Read More

HOW TO RECOVER DELETED FILES FROM EXTERNAL HARD DRIVE

Leave a Comment


With the easy use of technology today, everything seems to be super fast with the availability of anything and almost everything on fingertips. The improvement in technology has definitely changed the way we thought about computers and the enhanced user-friendly interface which provides a much faster as well as easier control of man over his machine.


The advantages linked with this improvement are innumerable, but every fort when looked closely would show some bits of cracks in one to two bricks. You may have occurred to thought once in your life that how much the digital data is important in your life and what if you lose it accidentally. Well, then surely you might find yourself engaged in trouble.

HOW TO RECOVER DELETED FILES FROM EXTERNAL HARD DRIVE


Below are a few simple steps to help you Recover Deleted Files from some external hard drive.
1. Prevent any further modifications in the drive you need to recover your data from If you have clicked on the delete button accidentally, and you need to get your data back, then the most important thing you must keep in mind is that you should not try to make any amendments in the files on the drive. This means do not delete any other data or add any data to the file. Just stop using it, and follow the proceeding steps.

2. Download a file Recovery Software from Internet (Recuva): Simply browse to Google, and search for some file recovery software online. You will get a good list of results, and you can choose to select any one of them after reviewing their features and other details.
Recuva is one of the most popular applications with some good reviews, and you may try it.

3. Install the Software and Follow the Instructions: Once you find the appropriate software, you may proceed to install it on your system, and then run it. It would then provide you a list of drives connected to your computer. Simply select the drive you need to recover drives from and start the scan. It would then provide you a list of files that existed on the drive in the past. Depending on the size of the drive, it may take time accordingly
4. Choose the files: After the list has been generated, all you need to do is tick mark the files you want to recover or select all if you need them all, and simply click on the “Recover” button.

Some other Recovery Softwares to Recover Deleted Files:
Apart from Recuva, there are several other free tools available in the market online which may help you with the Recover Deleted Files The names include Puran FileRecovery, Glary Undelete, SoftPerfect File Recovery, Pandora Recovery, Restoration, Avira UnErase Personal, Free Undelete, ADRC Data Recovery Tools and CD Recover Toolbox.
All these applications are completely free of cost and have a user-friendly interface. You may simply type “file recovery software” in Google to catch the best results, or query “download Recuva” to directly take you to the download pages.
Read More

TRICK TO ACCESS A WINDOWS DESKTOP FROM YOUR SMARTPHONE OR TABLET

Leave a Comment

Yes, you can Access a Windows Desktop from Your Smartphone or Tablet. IPads and android tablets or smartphones can’t run windows app locally, but with this, you can remote your Windows desktop, even with a physical keyboard. Many apps have been developed and launched like Microsoft remote desktop appTeamViewer for Remote Control, among which Microsoft app is mostly used for professional use while the other app can also be used for personal uses.


MICROSOFT’S REMOTE DESKTOP APP 


This app has reduced the workload from one’s head of staying in the home and working all day and canceling the vacations and many more just because the work info is available on your PC. With Microsoft remote desktop app, you can connect to your work resources and remote PC from anywhere you feel like working. This app is mostly used for business and professional use rather than personal use.

Features of this app :
  • Access your desktop with your phones easily.
  • Rich multi-touch experience with the remote desktop protocol (RDP).
  • It has an outstanding feature or technology, namely Network Layer Authentication which secure connection to your data and applications.
  • High-quality video and sound streaming.
Review for this app: This app is friendly for business-related persons or for professional use but not so friendly for personal use.

TEAMVIEWER FOR REMOTE CONTROL


This app is friendly for personal use too no matter wherever you are, rather than controlling your own computer you can also remotely troubleshoot your relative's PC.
Features : 
  • Access to computers (Windows, Mac, Linux) is possible also during a telephone call.
  • Transfer the files from your PC to the phone or from the phone to the PC.
  • Automatic quality adjustment.
  • Remotely reboot the computer.
  • TeamViewer free is for private use only e.g. to access or solve your or your friend's computer problems.
All you have to do is Download an Install Teamviewer on Your Desktop and Mobile, after installing on your smartphone you will have to log in with the details that TeamViewer window displays.


Other Options: Other than these two apps you surely have other options too if you are not friendly with both of them.
Splashtop: This is another popular remote desktop app that people reportedly has said that it is faster. But unfortunately, this is not a free app as it may cost you around $20 at a regular price. And to use it over the internet you need to buy an additional “Anywhere access pack”. This app can be used or purchased if you don’t mind spending money or if you need a faster app to complete your work fast.

Conclusion: With the development of these apps both personal and professional works are carried out easily and in a better manner with easy access.
Read More