Showing posts sorted by relevance for query Error. Sort by date Show all posts

Wednesday 3 August 2016

GOOGLE PLAY STORE ERROR 498 – 5 WAYS TO FIX IT

Leave a Comment


Recently While Downloading Asphalt game on my Smartphone I got an Error 498 in Google Play Store. To be Exact, the Error Reads “Error 498 has occurred while communicating with the server“.
I Tried again but the Same Error Again. After Few Tweaks, I was finally able to download and Install  Asphalt on my Phone.
Because I Faced this error in Google Play store, I thought there will be many other people facing the same error and so this Guide on how to Fix Error 498 in Gooogle Play store.

Here on this page, I will be sharing a few methods that will help you to get rid of it. Though anyone listed Method will not work for Everyone to Get rid of Google Play Error 498 because different reasons are responsible to cause this error.

CAUSES OF ERROR 498 IN PLAY STORE

A few things cause this Error on your Smartphone while you try to download any app from the Google Play store.
  • The most common issue is the Size of Device’s Cache Partition. You will get Error 498 in play store if you try to download apps that are larger in size then your Device’s Cache partition.
For Eg: Your Cache partition is of 30M and you try to download an app with Size 35M then you might get this error. Usually, the Play store has issues when downloading apps that are large in size.
  • Another Reason is Google Servers from where you are trying to download the apps might be under maintenance. So if you are downloading an App and you get Play store error 498 messages then Server may be the issue. Just wait and try to download it again.
So these were just a Couple of Possible Reasons for a User to get this Error in Google Play store, Now let us see Some Possible Ways to Fix it.

5 WAYS TO FIX GOOGLE PLAY STORE ERROR 498


METHOD 1: CLEARING CACHE

Most Common Reason you might be facing this Error is because of Cache, so I will start the Methods list by Recommending you to Clear the Cache.
To do So, Just navigate to Settings > Applications > Manage Applications > Select Google Play store > Clear Data & Clear Cache.
Now Try and download the App if Cache was the problem and clearing it solved the Issue for you.  One more reason for listing this method on top is this worked for me and I was able to download the game easily after clearing the Cache. Though the Solution for all might not be the same so try below methods too.

METHOD 2: USE WIFI TO DOWNLOAD.

Many times your Internet Service Provider(ISP) Creates this Problem of Error 498 and many other Errors. so Try and get access to Wifi somehow and try to download the app that giving you the Error.


METHOD 3: ADDING NEW PLAY STORE ACCOUNT.

You will need to add a new Play store account to fix this Error. Go to Settings > Accounts > Add New Account > Click on Google > Next > Enter email > Done.
After setting up a new Play store account try to download the same app and see if this has Solved your Problem.

METHOD 4: CONNECTING WITH COMPUTER:

One of my friends reported that he fixed Error 498 by installing apps from Computer to Smartphone. You just need to connect your Smartphone to Computer Using USB Cable. then go to Google Play Store using your Favorite Browser on your Computer. Then Search for the App which was getting an error on your Smartphone.
Click on the Preferred Result that you get, next On the App page you will see Install button. Click it to Download that app On your Smartphone. No, it will not Install on your Computer. it will install on your Smartphone. Just make sure your Smartphone is Connected or else you will not See Install Button.

METHOD 5: UNINSTALL & REINSTALL GOOGLE PLAY STORE:

If your Phone is Rooted then You might just want to Uninstall and Then Reinstall Google Play store so that to make sure that you actually get rid of Error 498 in Google Play Store. If any of the above-Listed methods don’t work for you then go for this one and you will fix it for sure.
So these were 5 Methods to Fix Error 498 In Play Store. I hope this helps you to get rid of this error and you can again download your favorite app from play store just like before.
If this Help then please don’t forget to spend a few seconds and Comment below which Method solved the Issue for you. Or If you have any other way to get rid of this error message in the play store then feel free to share it in Comments below.
Read More

ERROR 651 – METHODS TO FIX IT IN WINDOWS 7/8

Leave a Comment


If you are a windows user then it is possible that you have Face Error 651 Anytime. There are many windows users who get affected by this error code 651 while working online.
If you are one of those windows users, then keep reading this article and carefully read out the following Detailed solutions which I have gathered after researching various websites, articles, forums, etc.
So, without consuming more time I’ll directly come over the main point of this article. Error code 651 usually occurs when the user tries to connect its broadband in windows 7 operating system.
It shows a message that Your modem (or other connecting devices) has reported an error and Usually, the message will be “Connection failed with error 651”.
In such cases, the user tries to restart the whole computer, router or modem, But You can easily make out when you are facing this problem in your windows 7 as this error code 651 shows an error message when the user is working.

HOW TO FIX ERROR 651 IN WINDOWS


There are of course lots of suggestions and solutions available online to solve this Error but let me tell you that there is no official solution available online or guarantee for fixing this problem in windows 7. So, for helping out those users I have tried to gather all types of solution which can help you out in solving this problem on your Windows 7 or 8 operating system.
You can relax and follow below fixes to this particular error you are facing.
We Recommend You to First Download Total System Care and install it, Then Run the Softwares to See what issue your Computer have in First Place. Accordingly, you can move forward with the below Solutions.
So, without consuming more time I’ll directly come over the main point of this article. Error code 651 usually occurs when a user tries to connect its broadband in windows 7 operating system.
It shows a message that Your modem (or other connecting devices) has reported an error and Usually, the message will be “Connection failed with error 651”.
In such cases, the user tries to restart the whole computer, router or modem, But You can easily make out when you are facing this problem in your windows 7 as this error code 651 shows an error message when the user is working.

HOW TO FIX ERROR 651 IN WINDOWS


There are of course lots of suggestions and solutions available online to solve this Error but let me tell you that there is no official solution available online or guarantee for fixing this problem in windows 7. So, for helping out those users I have tried to gather all types of solution which can help you out in solving this problem on your Windows 7 or 8 operating system.
You can relax and follow below fixes to this particular error you are facing.
We Recommend You to First Download Total System Care and install it, Then Run the Softwares to See what issue your Computer have in First Place. Accordingly, you can move forward with the below Solutions.

1. UNINSTALL MODEM

By uninstalling the modem, users can solve this problem. This solution is Most Common to get rid of this particular error code. It is applicable for all type of dial-up modems. There are many people who had solved this problem by this method.

2. REPLACE RASPPPSE.SYS FROM WINDOWS 7 DRIVERS DIRECTORY

I have seen that many users have successfully solved this problem by replacing the response.sys file from the windows 7 directory.
This method will only work for those users who are currently using windows 7 operating system and are facing this problem.

3. DISABLE IPV6 FOR YOUR INTERNET CONNECTION

Users can also solve this problem by turning off the IPv6 for their dialer modem. This is one of the easiest ways for solving out this problem successfully. Right-click on the Connections, Select Properties, Then Uncheck the box which says Internet Protocol Version 6 (TCP/IPv6).

5. DISABLE WINDOWS 7 AUTO TUNING FEATURE

There are many people who suggested that by turning off the auto-tuning feature we can solve this problem. This method is useful for only those users who are using a router. To Disable Auto tuning follow the below steps.
  • Start a command prompt as an administrator.
  • Type in the below command and Press Enter
“Netsh interface TCP set global autotuning=disabled”

6. REINSTALL LAN CARD DRIVERS

We have seen that by reinstalling the LAN card drivers, Connection Error 651 problem can be solved. Sometimes it is possible that drivers may get corrupted and this is the reason why I will suggest you install your drivers again.

7. PERFORMING CLEAN BOOT

Performing a clean boot can help the user in finding the root cause of this problem. If there is no problem with your windows services then this method will not be working for you.

8. RECREATE DIALER AND RESTART ADSL MODEM ROUTER

It is possible that your internet modem could get hanged during the connection. By removing the dialer and then creating the new dialer can help the user a lot. Restarting the ADSL modem/router can also work during such types of cases.

TIPS TO AVOID ERROR 651 IN FUTURE.

Once you have fixed this error, all you want is to avoid this error as well as other Errors that Pops up in Windows. So we recommend you to Use Pc Optimizer tools like Total System Care and make use of it on a regular basis. It will keep your PC organized. The Registry entries Errors will be fixed which are the main culprit for most of the errors in windows.
So, these are the solutions that I have found while researching to Solve the Error code 651 in windows. If you are facing this problem in your windows 7 Pc then I will strongly recommend you to try these methods once.
I hope, you have liked the above article. If you face any type of problem after reading the above article carefully then you can surely leave your comments below in the comment box. Also if you have liked anything about the above article then kindly share this article with your friends to help them too…  :)
Read More

“UNFORTUNATELY, POKÉMON GO HAS STOPPED” ERROR FIXED

Leave a Comment


It’s Only Fair to say that Pokémon Go has become the best Game/App of all times. This has happened in a very short period. With this kind of popularity, also errors like Unfortunately, Pokémon Go Has Stopped working are gaining Popularity. Many of you will agree with me when I say Pokemon Go has taken the world by storm. The Game has Grabbed an Unexpected amount of traction from users worldwide.
Though Pokémon Go is not available worldwide just yet. It is only available in selected countries like New Zealand, Australia, Germany, and the US. In spite of this, The Craze for Pokémon Go is such that people around the world have access to the game by directly downloading APK files from various sources.
With Tons of Users playing Pokémon Go at a time, Its obvious that the servers are overloaded. It also means there can be Occasional Downtime and Errors/bugs too. Once Such Error that lots of Pokémon Go Users are facing is “Unfortunately, Pokémon Go has Stopped“. The Error Pops up Unexpectedly and then you can’t continue with the game further.
These kinds of errors are Common on Android Smartphones. It just does not happen with Pokémon Go but Also with other apps like Contacts, Message, etc. After Some Research, we have jotted down many methods that will help you to fix “Unfortunately, Pokémon Go Has Stopped” error. To make things even easy, we will take you through all the steps one by one.

FIXING, UNFORTUNATELY, POKÉMON GO HAS STOPPED ERROR

We will start with Basic Troubleshooting methods. In most cases, basic methods will fix the error for you. But if not, you can go ahead and perform Advance Method, which we have mentioned below. Remember to carry out the steps in the correct order. Go Step by Step and you will see to it that there is no more, Unfortunately, Pokémon Go Has Stopped error popping up on your phone while playing.

BASIC METHODS TO FIX UNFORTUNATELY, POKÉMON GO HAS STOPPED.


Method 1: Restart Your Phone.
It is a very simple thing that we fail to do. Rebooting or Turning your phone on and off is required at least once in 2 days Restarting your Phone looks to be not such an effective solution but actually, it makes a lot of difference in the case of Performance and Application Issues.
So go Ahead and Switch your phone off and then turn it On Again. Once it is ready to use, Open Pokémon Go and Start Playing. You should not See Unfortunately Pokémon Go has stopped working error message. But if you do, then check method #2.

Method 2: Clear Pokémon Go Cache and Data.
Like Browsers, your phone saves the Cache of your applications to make it faster. Cache makes your app faster but many times you need to clear them. You will Continue getting Unfortunately Pokemon go has stopped error again and again, no matter how many times you close and open the app. To fix this, you need to clear cache and data by just following the below steps.
  • Step 1: Go to Settings
  • Step 2: Scroll down to find Apps/Applications/Application Manager/Installed Apps. (Depends on Version of Android and ROM.)
  • Step 3: Now you will see list apps on your smartphone, Search for Pokémon go and tap on it.
  • Step 4: Tap on Clear Cache and Clear Data.
  • Step 5: That is it, Now restart your phone if you want.
By now you have cleared Cache and Data of Pokémon go app. Now next thing you will do is open the game again and see if you still get, Unfortunately, Pokemon go has stopped error.

Method 3: Reinstall Pokémon Go.
If the above methods don’t work to fix the issue, your next step should be Completely Uninstall the game. Then Reinstall it again. Your Data will not be lost if you uninstall the game because all your data is saved on servers.
This method goes like this:
Long Press Pokemon Go icon on your screen. Drag it towards Uninstall on top. Tap Yes if prompted for Confirmation. Your Game will be Uninstalled. You can even Uninstall it by going to Settings > Apps/Apps Manager > Pokemon Go > Uninstall.
Now Reinstall again by first downloading it from Google Play store. It is no Brainer you already know how to do it right?
When everything is done, Start Playing your favorite game without the irritating Unfortunately, Pokémon Go has stopped working error.

Method 4: Update Pokémon Go.
Pokémon go was launched since not so long, but there are already updates available. If you have not downloaded the updates and if your game is not up to date, then there is every chance you will keep getting this error.
To download the update, simply open Play Store, Search Pokémon go and if there is an update available then, you should see “Update” otherwise “Open“. This way you can make sure if your app is up to date or not.
These 4 Methods Comes under Basic ways to fix Unfortunately Pokémon go has stopped error but you must not worry if all of the above methods fail to fix the issue for you. Because we have found that not all methods are going to work for everyone but trying them is worth it.
We still have 1 method left in Advance ways to fix this error. Go Ahead and perform the steps mentioned below.

ADVANCED METHOD TO FIX UNFORTUNATELY, POKÉMON GO HAS STOPPED.


Method 5: Uncheck Don’t keep Activities.
You are Required to Activate the Developer option on your Smartphone to actually Uncheck the “Don’t Keep Activities” option. To Activate the Developer option follow the below steps.
  • Go to Settings.
  • Scroll down and tap on About Phone.
  • Tap on Build number for approx 7 times.
  • You must see a “You are now a developer!” just like the below picture.


That is it; the Developer option is now activated. Tap on it and scroll down to find “Don’t Keep Activities” and Uncheck the box next to it. Open Pokemon Go now and start playing without any disturbance. This should be your ultimate resort to the error. In most cases doing the steps above should fix the error message for you.

HOW TO HIDE DEVELOPER OPTION?

After Fixing, Unfortunately, Pokémon Go Has Stopped error, no Doubt you might want to Hide Developer option again. So, Go to Settings > Apps/Application manager and find the Settings app. Tap on it and clear data.
This will hide the Developer option from your phone. Now go ahead and enjoy Pokemon go and don’t forget to Catch’ em all.
Read More

Sunday 6 March 2016

CREATE WINDOWS 8 BOOTABLE USB – HOW TO GUIDE

Leave a Comment


There are several ways of installing an operating system on your computer. Most people do it by using a bootable CD/DVD of windows. But we really don’t need to install windows very frequently and because of this, it is so difficult to put this bootable disc in a safe place and remember where you have kept it when needed. Here are steps to make Windows 8 Bootable USB.
Also, several times when you are installing a window you see some error saying that some of the necessary installation files are missing from the disc and setup can not be continued. All this happens because of scratches present on the disc surface since the disc is too old to use.

Apart from all these, Not all Computers have working CD or DVD Drives. This creates a big issue for those who want to install operating systems via the Disc method, So today here I bring an easy tutorial to Create Windows 8 Bootable USB.

HOW TO CREATE WINDOWS 8 BOOTABLE USB


I here Assume that you already have an ISO image of Windows 8 or 7 of which you want to Create Bootable Pendrive.
Step 1: Download Windows 7 USB/DVD download tool and install it.
This tool is available for free from Microsoft Corporation as well so you can get it from there too. Despite its name, this tool works with Windows 8 ISOs as well. You can use this tool for any version of Windows.
Step 2:After downloading and installing the tool, Run it, now you need to Browse and give the path where the ISO  file is located in your computer.
Step 3:Now select whether you want to create a bootable DVD for windows or you want it to be a bootable pen drive. Here you need to select a USB device because you want to make bootable Pendrive.
Step 4: Browse and select the pen drive which you want to make bootable. Make sure that the pen drive has at least 4 GB free. Now click on Begin Copying.
Step 5:Once you begin copying, the tool will start creating a bootable Windows 8 USB installer flash drive using the Windows 8 ISO. Let this process complete, lastly when you see the message “Bootable USB Device created successfully”, you can restart your PC and boot from the USB drive.
So this was my Quick tutorial on how to Create Windows 8 Bootable USB, Hope this will help you.

Read More

Sunday 1 May 2016

SHUT DOWN ANY PC ON YOUR LAN USING COMMAND PROMPT

Leave a Comment

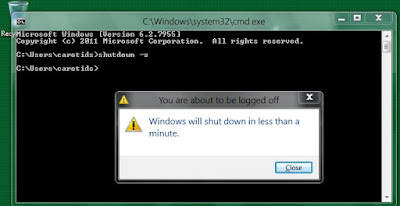
This trick will shutdown a selected pc from Your LAN network. You can apply this trick to your office or school. but I take no responsibilities for any action. It's just for fun. Here is how to use this trick :

1. Go to Start > Run and type in cmd

2. You will see the command prompt window. Now type in this command line.

shutdown.exe -i

And hit Enter. You will see the remote shutdown Window. If you know someone’s IP on a computer in your Local Area network, type in their IP Address after clicking the add button.

3. After entering the IP Address click OK. Now watch the person’s face as their computer shuts down.

Some friends have asked me that they got Access Denied error for the remote shutdown. Add the user with the privilege to force a remote shutdown on the computer you are about to Shutdown. To do this go to control panel > Administrative Tools > Local Security Settings. Now go to Security Settings > Local Policies > User Rights Assignment. Double-click on Force shutdown from a remote system in the right pane and click on Add User or Group. Add the computer that runs the remote shutdown command.


Or you can do this go the computer you are about to Shutdown
a) Go to Start > Run > type in Regedit in the dialog box and hit enter
b) Go to My Computer/HKEY_LOCAL_MACHINE /system/current control set/control/lsa
c) Find “force guest” in the right pane Double click on it to modify This entry change the value from “1″ entry to “0″


Read More