Showing posts sorted by date for query windows. Sort by relevance Show all posts

Sunday 6 March 2016

REMOVE WRITE PROTECTION IN PENDRIVE AND MEMORY CARD

Leave a Comment


Don’t you just hate it when you buy a Pendrive or a Memory card and there’s nothing you can do to it? Whether it comes with software on it, or you’re just trying to use it for any other purpose, you should have the right to change things up however you like.
In this guide, you will be shown how to Remove Remove write protection in Pendrive and Memory Card. It’s a fairly simple process, so be sure to follow each and every step carefully. This guide is for information purposes and we are not responsible for anything that may happen to your device in the process.
Before we proceed, what is Write protection exactly? Write Protection is when the manufacturer locks the device down from being written on and prevents unauthorized access to add, change or delete the files on the device. While the uses of write protection are a good thing because it prevents files from being tampered with and the manufacturer can make sure all users are getting the same files, but it’s also very inconvenient. To remove this protection, you will need to format the drive.
In this guide, I will show you exactly how to do that. Follow each and every step carefully, please. Windows platform is used for the purpose of this guide.


HOW TO REMOVE REMOVE WRITE PROTECTION IN PENDRIVE?


Step 1: Plugin your pen drive into your USB 2.0 on your computer. To make sure the computer has read your pen drive, you can go down to your bottom left on Windows, you will notice a small USB drive icon. If you click that, it will say “Removable Disk.” This means that the pen drive has been read successfully.  You can take a backup of your files from the pen drive or Memory card Because we here are going to format it Completely.


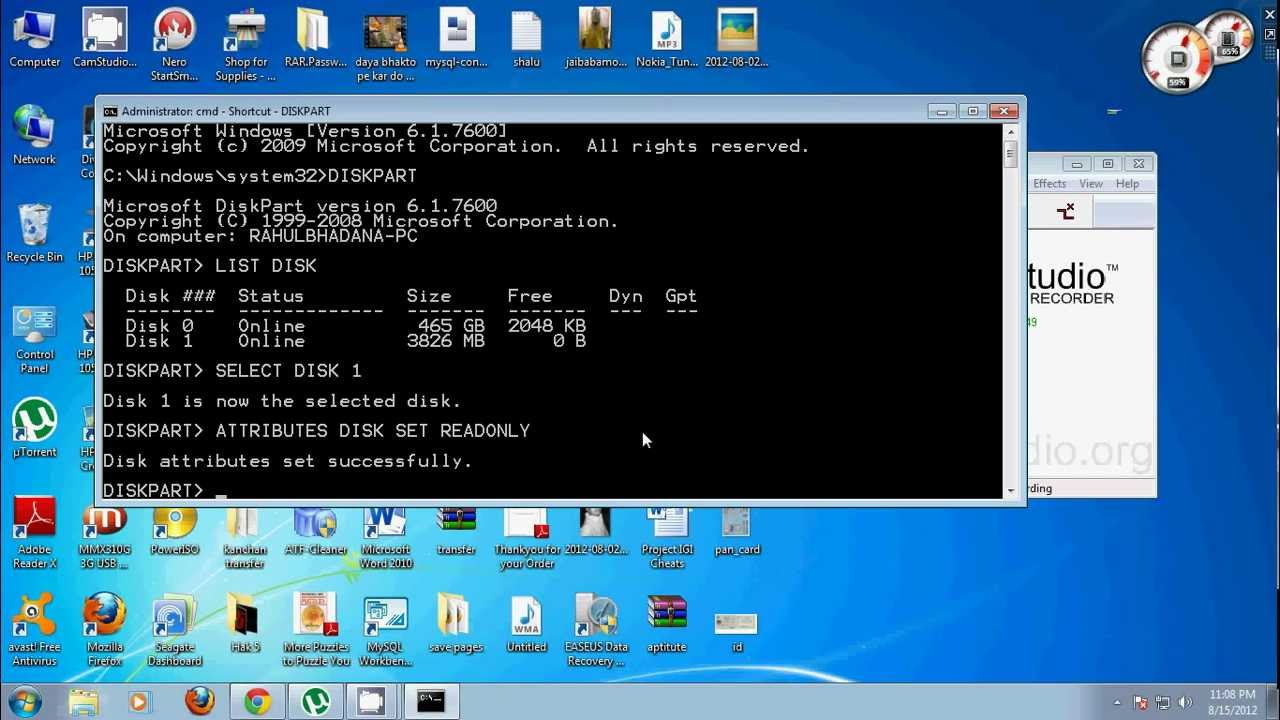
Step 2: Next we need to open up the command prompt. You can do this by simply going to “Start”, then just search for “Command Prompt”, or you can simply just type in “cmd” and a command prompt should pop up.
Step 3: In the command prompt, type in the drive letter of your pen drive with a colon at the end, like this: “ F: ” but without the quotation marks.
Step 4: After putting in the previous command, type in “format” without the quotation marks. Here’s how to do it: “format F:” and then press “Enter.”
This should get the process started to Remove write protection in Pendrive. Make sure that you are entering the right command with the right drive letter. If you have more than one pen drive plugged in, make sure that you do select the right one as you can accidentally format the wrong drive, causing loss of data.
Step 5: After the process is complete, proceed to the close command prompt.
Read More

CREATE WINDOWS 8 BOOTABLE USB – HOW TO GUIDE

Leave a Comment


There are several ways of installing an operating system on your computer. Most people do it by using a bootable CD/DVD of windows. But we really don’t need to install windows very frequently and because of this, it is so difficult to put this bootable disc in a safe place and remember where you have kept it when needed. Here are steps to make Windows 8 Bootable USB.
Also, several times when you are installing a window you see some error saying that some of the necessary installation files are missing from the disc and setup can not be continued. All this happens because of scratches present on the disc surface since the disc is too old to use.

Apart from all these, Not all Computers have working CD or DVD Drives. This creates a big issue for those who want to install operating systems via the Disc method, So today here I bring an easy tutorial to Create Windows 8 Bootable USB.

HOW TO CREATE WINDOWS 8 BOOTABLE USB


I here Assume that you already have an ISO image of Windows 8 or 7 of which you want to Create Bootable Pendrive.
Step 1: Download Windows 7 USB/DVD download tool and install it.
This tool is available for free from Microsoft Corporation as well so you can get it from there too. Despite its name, this tool works with Windows 8 ISOs as well. You can use this tool for any version of Windows.
Step 2:After downloading and installing the tool, Run it, now you need to Browse and give the path where the ISO  file is located in your computer.
Step 3:Now select whether you want to create a bootable DVD for windows or you want it to be a bootable pen drive. Here you need to select a USB device because you want to make bootable Pendrive.
Step 4: Browse and select the pen drive which you want to make bootable. Make sure that the pen drive has at least 4 GB free. Now click on Begin Copying.
Step 5:Once you begin copying, the tool will start creating a bootable Windows 8 USB installer flash drive using the Windows 8 ISO. Let this process complete, lastly when you see the message “Bootable USB Device created successfully”, you can restart your PC and boot from the USB drive.
So this was my Quick tutorial on how to Create Windows 8 Bootable USB, Hope this will help you.

Read More

BOOST YOUR PC PERFORMANCE-HOW TO GUIDE

Leave a Comment

It is frustrating, when you sit down to work, doing something important, and your computer takes long processing time for every possible instruction you give. A great amount of dissatisfaction is felt when these electronic devices work slow. The mobile phones and the computers are the two devices where the user wants results with the click of a button and in a fraction of a second.
Over some time the speed of these devices especially computers go very slow. A variety of reasons that can be traced for Poor performance are:
  • Hard drive space not enough
  • Too many unused programs on the disk
  • Outdated versions of the operating system
  • The outdated version of the drivers installed


TIPS TO BOOST YOUR PC PERFORMANCE


1)There are lots of ways to Boost Your PC performance and improve performance even without changing the hardware. One of the biggest and the common reason for a slow PC is the presence of a virus, a malicious program that affects your PC speed. The virus eats your PC speed by using the computer resources and it also corrupts the system hardware and its software. Installing a good antivirus or even installing some basic antivirus would surely improve the speed and would accelerate the speed.
2)Having lots of load on your hard disk drive also slows the speed of your PC. The PC needs 5GB of free space to work and if you do not have then the speed is affected. The solution in such a scenario is simple which is either to remove the unwanted files or transfer them to any other external hard disk especially the audio, video and the image files that occupy a lot of space.
3)Having too many shortcuts or having too many unused icons on the desktop or unused files all are substantial reasons for a slow PC. It is essential to reduce this clutter by deleting it. There is always a set of junk files created when you work on the internet especially when you download files, install programs or even when you uninstall programs. It is extremely essential to remove these junk files once the task is done to ensure better performance.
4)Disk defragmentation utility in the Windows operating system is one of the best ways to improve your system performance. It is seen that over some time you perform certain activities like creating a file, modifying a file or deleting a file due to which your files get scattered on the disk. It becomes time-consuming for the system to retrieve such files so the disk defragmentation utility enables to fragment of the scattered file. It can be used once in a week for better performance
5)The disk cleanup utility can also be used to clean all the unused and unwanted temporary files created at the time of using the internet. Also, it cleans all the files in the trash that are no longer required. So implementing some of the few tips mentioned above can surely give you a better PC performance.
Read More

WHAT IS TROJAN HORSE VIRUS AND HOW TO REMOVE IT.

Leave a Comment

Are you facing virus threats on your computer? Is your computer behaving abruptly or are you the victim of a disk crash?  Is your computer hacked by a Trojan horse virus attack? A Trojan horse virus attack is one of the most dangerous threats to your computer and needs to be fixed immediately. If it is not protected on time, then the virus can lead to failures in connecting to the IRC network or even worse can lead to your computer hacking and then your computer might be used by some anti-social elements in shaping some criminal attacks.


ABOUT TROJAN HORSE VIRUS


Before knowing how to remove this evil threat first one should know what actually a trojan horse is? It is a security breaking program, also malicious to your computer and is disguised in some benign object. It can be downloaded unknowingly through any document, executable, zip, movie or music file and unleashes a dangerous malware into your drive on executing the files.
This malware can completely wipe your disk or can even send your credit card details and passwords to any stranger on the web. It is not at all operating system specific. It can affect any operating system but affects windows more promptly due to its popularity and weaknesses. This is a silent attacker and many people come to know about its attack after it has infected other connections.

HOW TO REMOVE TROJAN HORSE VIRUS


  • There are many ways one can avoid itself from being a victim of this malicious virus but the best is to be attentive in downloading and executing files from an unknown source or person and also doing a background check of it if downloading from a known source. But if you have already been a victim of it then you need to take immediate steps to remove it from your drive before it creates some major problem. You need to repair and then reformat your system completely to remove all malware which may take from several hours to several days.
It is quite possible that the removal has not been done properly and may lead to the coming back of the virus again and again in such cases you must take stronger measures to curb this problem.
  • Firstly you need to have anti-virus software installed in your system and that too an updated one or else they will miss the latest species of Trojan horse. Anti-virus software helps prevent the system from many Trojan viruses. Then make sure you have updated your operating system as well with all new security patches.
  • One may also have to install Anti-trojan programs like The Cleaner which specializes in Trojans. Once it is installed reboot your computer in safe mode and use the cleaner to clean all registries and drives for any Trojan suspected. Make sure the internet is unplugged while cleaning. Once cleaning is complete reboot the system again.
  • After using the cleaner make sure that you have updated your operating system and have changed all the passwords. Once the system is repaired make sure to take a backup of every data and reformat the system completely.

Read More

TRICK TO ACCESS A WINDOWS DESKTOP FROM YOUR SMARTPHONE OR TABLET

Leave a Comment

Yes, you can Access a Windows Desktop from Your Smartphone or Tablet. IPads and android tablets or smartphones can’t run windows app locally, but with this, you can remote your Windows desktop, even with a physical keyboard. Many apps have been developed and launched like Microsoft remote desktop appTeamViewer for Remote Control, among which Microsoft app is mostly used for professional use while the other app can also be used for personal uses.


MICROSOFT’S REMOTE DESKTOP APP 


This app has reduced the workload from one’s head of staying in the home and working all day and canceling the vacations and many more just because the work info is available on your PC. With Microsoft remote desktop app, you can connect to your work resources and remote PC from anywhere you feel like working. This app is mostly used for business and professional use rather than personal use.

Features of this app :
  • Access your desktop with your phones easily.
  • Rich multi-touch experience with the remote desktop protocol (RDP).
  • It has an outstanding feature or technology, namely Network Layer Authentication which secure connection to your data and applications.
  • High-quality video and sound streaming.
Review for this app: This app is friendly for business-related persons or for professional use but not so friendly for personal use.

TEAMVIEWER FOR REMOTE CONTROL


This app is friendly for personal use too no matter wherever you are, rather than controlling your own computer you can also remotely troubleshoot your relative's PC.
Features : 
  • Access to computers (Windows, Mac, Linux) is possible also during a telephone call.
  • Transfer the files from your PC to the phone or from the phone to the PC.
  • Automatic quality adjustment.
  • Remotely reboot the computer.
  • TeamViewer free is for private use only e.g. to access or solve your or your friend's computer problems.
All you have to do is Download an Install Teamviewer on Your Desktop and Mobile, after installing on your smartphone you will have to log in with the details that TeamViewer window displays.


Other Options: Other than these two apps you surely have other options too if you are not friendly with both of them.
Splashtop: This is another popular remote desktop app that people reportedly has said that it is faster. But unfortunately, this is not a free app as it may cost you around $20 at a regular price. And to use it over the internet you need to buy an additional “Anywhere access pack”. This app can be used or purchased if you don’t mind spending money or if you need a faster app to complete your work fast.

Conclusion: With the development of these apps both personal and professional works are carried out easily and in a better manner with easy access.
Read More

HOW TO PROTECT WI-FI NETWORK FROM HACKERS

Leave a Comment


Do you use a wireless network like Wi-Fi at your home or office? And afraid of it getting hacked by other people (hackers)? Now a day hacking has become key stress or tension for the peoples and are you one among them getting stressed? Then now you don’t need to get worried about it and let me handle that stress and problem, you just have to do is go through this article and try the stated tips on your own and learn How to Protect Wi-Fi network.


Wireless Networking (Wi-Fi) has made it so easy for anyone to use the Internet on your computer, mobile phones, tablets, and other wireless devices anywhere in the house without the clutter of cables.

With traditional wired networks, it is extremely difficult for someone to steal your bandwidth but the big problem with wireless signals is that others can access the Internet using your broadband connection even while they are in a neighboring building or sitting in a car that’s parked outside your apartment.
This practice, also known as piggybacking, is bad for three reasons:
  • It will increase your monthly Internet bill especially when you have to pay per byte of data transfer.
  • It will decrease your Internet access speed since you are now sharing the same internet connection with other users.
  • It can create a security hazard* as others may hack your computers and access your personal files through your own wireless network.
[*] What do the bad guys use – There have been quite a few instances where innocent Internet users have been arrested for sending hate emails when in reality, their email accounts where hacked though the unsecured Wi-Fi networks that they had at home. Wireshark is a free packet sniffing tool for Linux, Mac, and Windows that can scan traffic flowing through a wireless network including cookies, forms, and other HTTP requests.

How to Secure Your Wireless Network

The good news is that it is not very hard to make your wireless network secure, which will both prevent others from stealing your internet and will also prevent hackers from taking control of your computers through your own wireless network.
Here a few simple things that you should secure your wireless network:

Step 1. Open your router settings page

First, you need to know how to access your wireless router’s settings. Usually, you can do this by typing in “192.168.1.1” into your web browser, and then enter the correct user name and password for the router. This is different for each router, so first, check your router’s user manual.
You can also use Google to find the manuals for most routers online in case you lost the printed manual that came with your router purchase. For your reference, here are direct links to the manufacturer’s site of some popular router brands – LinksysCiscoNetgearApple AirPortSMCD-LinkBuffalo, TP-LINK3ComBelkin.

Step 2. Create a unique password on your router

Once you have logged into your router, the first thing you should do to secure your network is to change the default password* of the router to something more secure.
This will prevent others from accessing the router and you can easily maintain the security settings that you want. You can change the password from the Administration settings on your router’s settings page. The default values are generally admin/password.
[*] What do the bad guys use  This is a public database of default usernames and passwords of wireless routers, modems, switches, and other networking equipment. For instance, anyone can easily make out from the database that the factory-default settings for Linksys equipment can be accessed by using admin for both username and password fields.

Step 3. Change your Network’s SSID name

The SSID (or Wireless Network Name) of your Wireless Router is usually pre-defined as “default” or is set as the brand name of the router (e.g., Linksys). Although this will not make your network inherently* more secure, changing the SSID name of your network is a good idea as it will make it more obvious for others to know which network they are connecting to.
This setting is usually under the basic wireless settings in your router’s settings page. Once this is set, you will always be sure that you are connecting to the correct Wireless network even if there are multiple wireless networks in your area. Don’t use your name, home address or other personal information in the SSID name.
[*] What do the bad guys use  Wi-Fi scanning tools like inSSIDer(Windows) and Kismet (Mac, Linux) are free and they will allow anyone to find all the available Wireless Networks in an area even if the routers are not broadcasting their SSID name.

Step 4. Enable Network Encryption

To prevent other computers in the area from using your internet connection, you need to encrypt your wireless signals.
There are several encryption methods for wireless settings, including WEP, WPA (WPA-Personal), and WPA2 (Wi-Fi Protected Access version 2). WEP is basic encryption and therefore least secure (i.e., it can be easily cracked*, but is compatible with a wide range of devices including older hardware, whereas WPA2 is the most secure but is only compatible with hardware manufactured since 2006.
To enable encryption on your Wireless network, open the wireless security settings on your router’s configuration page. This will usually let you select which security method you wish to choose; if you have older devices, choose WEP, otherwise, go with WPA2. Enter a passphrase to access the network; make sure to set this to something that would be difficult for others to guess, and consider using a combination of letters, numbers, and special characters in the passphrase.
[*] What do the bad guys use  AirCrack and Chowpatty are some free tools that allow even non-hackers to crack the WEP / WPA (PSK) keys using a dictionary or brute force techniques. A video on YouTube suggests that AirCrack may be easily used to break WiFi encryption using a jail-broken iPhone or an iPod Touch.

Step 5. Filter MAC addresses

Whether you have a laptop or a Wi-Fi enabled mobile phone, all your wireless devices have a unique MAC address (this has nothing to do with an Apple Mac) just like every computer connected to the Internet has a unique IP address. For an added layer of protection, you can add the MAC addresses of all your devices to your wireless router’s settings so that only the specified devices can connect to your Wi-Fi network.
MAC addresses are hard-coded into your networking equipment, so one address will only let that one device on the network. It is, unfortunately, possible to spoof a MAC address*, but an attacker must first know one of the MAC addresses of the computers that are connected to your Wireless network before he can attempt spoofing.
To enable MAC address filtering, first make a list of all your hardware devices that you want to connect to your wireless network**. Find their MAC addresses, and then add them to the MAC address filtering in your router’s administrative settings. You can find the MAC address for your computers by opening Command Prompt and typing in “ipconfig /all”, which will show your MAC address beside the name “Physical Address”. You can find the MAC addresses of Wireless mobile phones and other portable devices under their network settings, though this will vary for each device.
[*] What do the bad guys use – Someone can change the MAC address of his or her own computer and can easily connect to your network since your network allows connection from devices that have that particular MAC address. Anyone can determine the MAC address of your device wireless using a sniffing tool like Nmap and he can then change the MAC address of his own computer using another free tool like MAC Shift.

Step 6. Reduce the Range of the Wireless Signal

If your wireless router has a high range but you are staying in a small studio apartment, you can consider decreasing the signal range by either changing the mode of your router to 802.11g (instead of 802.11n or 802.11b) or use a different wireless channel.
You can also try placing the router under the bed, inside a shoebox or wrap a foil around the router antennas so that you can somewhat restrict the direction of signals.
Apply the Anti-Wi-Fi Paint – Researchers have developed a special Wi-Fi blocking paint that can help you stop neighbors from accessing your home network without you having to set up encryption at the router level. The paint contains chemicals that block radio signals by absorbing them. “By coating an entire room, Wi-Fi signals can’t get in and, crucially, can’t get out.”

Step 7. Upgrade your Router’s firmware

You should check the manufacturer’s site occasionally to make sure that your router is running the latest firmware. You can find the existing firmware version of your router using the router’s dashboard at 192.168.*.

Connect to your Secure Wireless Network

To conclude, MAC Address filtering with WPA2 (AES) encryption (and a really complex passphrase) is probably the best way to secure your wireless network.
Once you have enabled the various security settings in your wireless router, you need to add the new settings to your computers and other wireless devices so that they all can connect to the Wi-Fi network. You can select to have your computer automatically connect to this network, so you won’t have to enter the SSID, passphrase and other information every time you connect to the Internet.
Your wireless network will now be a lot more secure and intruders may have a tough time intercepting your Wi-Fi signals.

Who is Connected to your Wireless Network

If you are worried that an outsider may be connecting to the Internet using your Wireless network, try AirSnare – it’s a free utility that will look for unexpected MAC addresses on your Wireless network as well as to DHCP requests. Another option is that you open your router’s administration page (using the 192.168.* address) and look for the DHCP Clients Table (it’s under Status > Local Network on Linksys routers). Here you will see a list of all computers and wireless devices that are connected to your home network.

Read More

Saturday 5 March 2016

RESIZE IMAGE WITHOUT LOOSING QUALITY – HOW TO GUIDE

Leave a Comment


People hate to visit websites that require more time for loading. So one should always seek to improve the webpage load time, so to do so you have to look at many things like loading sources, page cache, media files, etc. One among such media file is images, adding beauty to your page, but at the same time, it is regarded as the bulkiest resources which takes much time to load on the page, thereby causing inconvenience to the visitors.
But one can improve the page load time by cutting the size of an image to a significant amount. But even resizing the image without any proper knowledge may be troublesome as you may lose the quality it had. Though photoshop provides a nice feature to save the original quality of the pic, it is not preferred much as it’s too expensive to purchase the photoshop application for desktop or web version. So here I’m going to provide you with free online tools to Resize Image without losing Quality

WEB-BASED TOOLS TO RESIZE IMAGE WITHOUT losing QUALITY


1.KRAKEN.IO :

JPEG, PNG, GIF, SIV are some of the image formats that can be compressed with this online application. This reduces the image to a quite considerable point without losing the image size.
This application is also available in Chrome and Firefox extensions

2.IMAGEOPTIMIZER.NET:

After uploading the image from your computer, give the size of the image and quality you wish to have after processing. This provides only some control of the output and compression ratio But Greatly Helps to Resize Image without losing Quality.

3.SMUSH.IT:

Smush.it is the best and popular online application you can have to compress images. It is present with an up-loader as well as a URL box to have the image. In this, you will not be provided with the ‘enter’ option to enter the image quality as that of the previous one because it automatically optimizes the image by compressing it to a limit.

4.COMPRESSJPG.COM & COMPRESSPNG.COM :

I would suggest you have this application, for more control of the image quality. A slider appears as soon as you upload an image to auto control the quality of the last image. A preview panel is provided for showcasing the changes according to the quality slider change. So before downloading the image, you can have a review of your final image. This application is available on different domains for JPG and PNG images.

5.PUNYPNG.COM :

This application is available to compress the PNG files. Upload an image and you can get a compressed size of the image. Besides this, tinypng.com, a quick tool to compress the PNG images to the best level without affecting the image quality.

DESKTOP TOOL TO RESIZE IMAGE WITHOUT losing QUALITY


If you need a Desktop tool to do this task then I would suggest you to have PNG Gauntlet as your first choice, You will need. Microsoft Net Framework 4.0 to run this tool on your Windows.
Resize Image without loosing Quality

You won’t face any difficulty in Using this tool as it is very User-Friendly. While Optimizing the images PNG Gauntlet will show you the older size and Optimized size of the image. this Program is not that Fastest at its work but Useful.
Read More

UNINSTALL PROGRAMS EASILY WITH THESE THIRD-PARTY UNINSTALLERS

Leave a Comment


In Windows One Can not Just Click on “Delete” to Uninstall a program in Windows, you have to run the Software Uninstaller or you Can do it with Control Panel. Many times People Find it Difficult to uninstall a Specific program. You might not be aware of the Fact that Uninstalling Programs through Control panel does not always uninstall it Completely. Traces are still left in Registry and Program Files folder.
To Overcome this Problem and Uninstall Programs once and for all, you need to use third-party Uninstallers. I will Mention 3 best Uninstallers which will help you to uninstall any program completely and easily including the registry entries. These uninstallers also come with additional features such as Batch Uninstall, Program Sorting which makes them much easier to use.

3 THIRD-PARTY UNINSTALLERS TO UNINSTALL PROGRAMS IN WINDOWS


1) Iobit Uninstaller 3: Iobit Uninstaller is my Preferred Program to Uninstall Applications from my PC without keeping any Leftovers. Iobit uninstaller 3 is Free to use and  Comes with beautiful and user-Friendly Interface, Big advantage of Iobit Uninstaller 3 is the fact that it is Portable and Light. which means you don’t need to Install this Program and can Carry it anywhere you want.
Iobit uninstaller 3 Also Creates System Restore Point for you, It shows you the list of programs that have been installed on your Windows so that you Can easily Uninstall them, or Can even Batch Uninstall Programs to Speedup the Process.

2) Comodo Program Manager: Comodo Program manager is another Program to Uninstall Programs from Windows Easily. Besides Uninstalling Programs, Comodo Program Manager Comes with Many more Useful Features. It is Simple to use as it comes with User-friendly interface. this Program also helps you to remove Drivers, services and Windows Updates.
Comodo Program Manager Is always Active and running in the Background, So whenever you try to run a setup, it checks for Malwares using their Cloud Technology. The only Disadvantage I Find with this Program is it may use a Fair amount of your Computer resource as it is always Actively running in Background.

3) Revo Uninstaller: Revo Uninstaller is one of the Popular Third-Party software that is used by many to Uninstall Programs. Revo uninstaller is Fast and reliable, you can uninstall single and multiple Programs easily and fast.
It is not available to download for Free from their official site but you can enjoy all the features by downloading 30 days free trial pack. You may think of Purchasing if none of the above two programs Interests you Which are Free and much Better. 

Read More